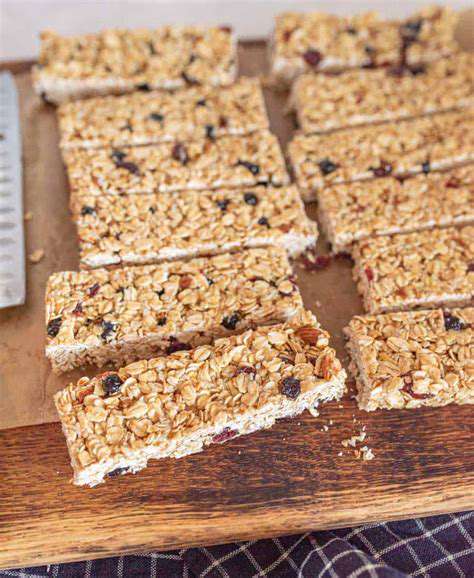
Homemade Granola Bars: Healthy and Portable
Nutrient-Packed Ingredients
When crafting your own snacks, homemade granola bars stand out as a superior choice because you decide exactly what goes into them. Swapping processed sugars and unhealthy fats for wholesome ingredients like rolled oats, nuts, seeds, and dried fruits transforms a simple snack into a nutrient-dense powerhouse. These components deliver essential vitamins, minerals, and fiber, making each bite more satisfying and beneficial than anything you'd find on store shelves.
Whole grains, especially rolled oats, form the foundation of a great granola bar. They're packed with fiber, which aids digestion and keeps hunger at bay for hours. Tossing in almonds, walnuts, or chia seeds not only adds crunch but also infuses your snack with healthy fats, protein, and micronutrients that elevate its nutritional value.
Customization for Optimal Health
The beauty of homemade granola bars lies in their versatility. Need more protein? Stir in protein powder or extra nuts. Watching your sugar intake? Reduce or skip added sweeteners like honey—the bars will still taste delicious with natural sweetness from dried fruits. This level of control lets you create snacks that align perfectly with your health goals without sacrificing flavor.
Flavor customization is where creativity shines. Mix in tart cranberries, juicy blueberries, or plump raisins for bursts of natural sweetness and antioxidants. A sprinkle of cinnamon, ginger, or nutmeg adds warmth while potentially offering anti-inflammatory benefits. The possibilities are endless when you're the chef.
The Importance of Whole Grains
Whole grains deserve special attention in any healthy diet, and granola bars present a tasty vehicle for them. Their high fiber content regulates blood sugar, supports digestion, and promotes satiety—key factors for weight management and overall wellness. Choosing whole grain ingredients ensures your snack works with your body, not against it.
Homemade Granola Bars vs. Store-Bought
While convenient, commercial granola bars often hide excessive sugars, unhealthy fats, and artificial additives behind their packaging. When you make your own, you eliminate these questionable ingredients while tailoring the bars to your dietary needs. The result? A genuinely nutritious snack that supports rather than undermines your health.
Taking the homemade route represents more than just a cooking project—it's an investment in your wellbeing. By selecting quality ingredients and avoiding processed shortcuts, you create snacks that nourish your body while delighting your taste buds. The ability to customize for allergies, preferences, or nutritional requirements makes homemade bars superior in every way.
Preparation and Storage Tips
Mastering granola bar preparation requires attention to detail. Precise measurements ensure consistent results, while parchment paper prevents sticky situations. Patience during cooling allows bars to set properly, creating the ideal texture. For storage, airtight containers in cool, dry spots preserve freshness longest, preventing moisture from ruining your hard work.
Understanding these nuances guarantees your homemade creations maintain their quality from first batch to last. Proper storage means you can prepare in advance without sacrificing taste or texture—a boon for busy lifestyles.
Easy Steps to Delicious Homemade Granola Bars
Ingredient Gathering and Preparation
Successful cooking begins with preparation. Assembling all ingredients beforehand streamlines the process and prevents mid-recipe scrambles. Quality matters—fresh, premium ingredients translate directly to superior flavor and texture in your final product. This preparatory step transforms cooking from stressful to enjoyable.
Measuring with Precision
Baking is a science where measurements matter. Even small deviations in quantities can alter texture, taste, and appearance dramatically. Use proper measuring tools—cups for dry ingredients, clear liquid measuring cups for wet—to ensure accuracy. Level off dry ingredients with a straight edge for consistency between batches.
Mixing Techniques for Optimal Results
Texture hinges on mixing methods. Gentle folding preserves air pockets for lighter results, while thorough blending ensures even distribution. For granola bars, mix dry ingredients first, then add wet components just until combined—overmixing leads to toughness. Understanding these nuances elevates your culinary results.
Essential Equipment for Success
The right tools transform cooking from chore to joy. A good baking pan, parchment paper, sturdy mixing bowls, and reliable measuring tools form the foundation for granola bar success. Specialized items like nut choppers or bench scrapers can further streamline the process, making preparation efficient and enjoyable.
Understanding Cooking Temperatures
Heat management makes or breaks baked goods. An oven thermometer verifies accuracy since many ovens run hot or cold. For granola bars, moderate heat (usually 325-350°F) allows thorough cooking without burning. Rotating pans halfway through ensures even browning—small details with big impacts.
Following the Recipe Instructions Carefully
Recipes provide blueprints for success. Each step builds upon the previous one, so careful attention ensures proper texture development and flavor balance. Read through completely before starting, noting any special techniques or timing requirements. This preparation prevents mistakes and yields consistent results.
Tasting and Adjusting as Needed
The final judge of any recipe is your palate. Adjust seasonings gradually, tasting after each addition to avoid overcorrection. For granola bars, consider balance—sweetness from dried fruits might need tempering with sea salt, or spices might need amplification. This refinement step personalizes your creation.
Storage and Enjoyment: Keeping Your Bars Fresh
Proper Storage for Optimal Flavor
How you store food directly impacts its longevity and quality. Airtight containers block moisture and odors, preserving texture and taste. For granola bars, consider individual wrapping for grab-and-go convenience. Glass containers prevent flavor absorption, while portioned freezer storage extends shelf life for months.
Temperature Control for Freshness
Different foods demand specific climates. Cool, dark pantries suit room-temperature items, while refrigeration preserves moisture-sensitive ingredients. Freezing works wonders for long-term storage—just ensure proper wrapping to prevent freezer burn. For granola bars, room temperature usually suffices for short-term, while freezing maintains quality for extended periods.
Enjoying Your Food at its Best
Proper storage means enjoying peak flavors. Thaw frozen items gradually in the refrigerator to preserve texture. For granola bars, a quick oven warm-up can revive crispness if they've softened. Pair with complementary items—yogurt for breakfast or nut butter for snacks—to enhance the eating experience.
Presentation and Serving for Enhanced Enjoyment
We eat with our eyes first. Simple garnishes like fresh fruit or a drizzle of honey transform humble granola bars into appealing treats. Consider cutting bars into uniform sizes for visual appeal, or arrange on a wooden board with accompaniments for entertaining. These finishing touches make homemade creations feel special.
Tips for Success: Achieving the Perfect Texture
Choosing the Right Ingredients
Ingredient selection directly impacts texture. Old-fashioned oats provide more chew than quick oats, while varied nuts create interesting crunch contrasts. Consider your texture goals—more nuts for crunch, extra dried fruit for chewiness—and select ingredients accordingly. Quality matters; fresh nuts stay crisper than stale ones.
Mastering the Mixing Technique
Mix with intention. Combine dry ingredients thoroughly before adding wet to ensure even distribution. Stir just until the mixture comes together—overworking develops gluten, leading to toughness. For clustered bars, press mixture firmly into the pan; for crumblier texture, use a lighter touch.
Controlling Moisture Content
The wet-dry balance determines everything. Too little binding agent creates crumbly bars; too much yields gummy results. If mixture seems dry, add liquid a teaspoon at a time. For overly wet mix, sprinkle in extra oats. The perfect consistency should hold together when pressed without oozing moisture.
Baking Time and Temperature
Ovens vary, so visual cues matter. Bars should turn golden at the edges but remain slightly soft in center when done—they'll firm upon cooling. Check a few minutes early to prevent overbaking. For chewier bars, reduce time slightly; for crunchier, extend slightly while watching carefully to avoid burning.
Cooling and Storage
Patience rewards texture perfection. Cool bars completely before cutting—this prevents crumbling and allows flavors to settle. Store layers separated by parchment in airtight containers. For humid climates, adding a silica packet prevents moisture absorption. Properly stored, quality homemade bars maintain texture for weeks.
- Decadent Chocolate Chip Cookies: The Secret to Perfect Chewyness
- Simple Pasta Dishes: Weeknight Wonders
- Vegetarian Meal Prep Bowls: Easy and Nutritious
- Keto Desserts: Guilt Free Sweet Treats
- How to Choose the Freshest Seafood at Your Market
- Oven Baked Dinners: Less Mess, More Flavor
- Discovering Korean BBQ: Essential Marinades and Grilling Tips
- Cooking for Special Diets: Allergies and Intolerances
- Dairy Free Desserts: Creamy Vegan Ice Cream Recipe
- Batch Cooking Tips: Save Time and Effort in the Kitchen
- Low Sugar Meals: Balanced and Flavorful
- Vegan Lunch Ideas for Work: Easy and Convenient